
Problematics
Let’s imagine our application as a tree-like structure, where blocks represent components, and elements inside them represent state. We create components to separate logic, UI, and other concerns. As a result, each component has its own logic and state.
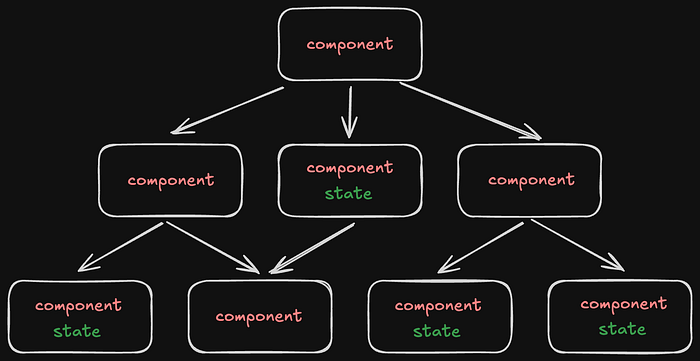
For small applications, this approach works well. Components encapsulate their functionality, and their state remains isolated. However, as the application grows, the need for data sharing between different components — sometimes located in distant branches of the tree — becomes inevitable.
Press enter or click to view image in full size
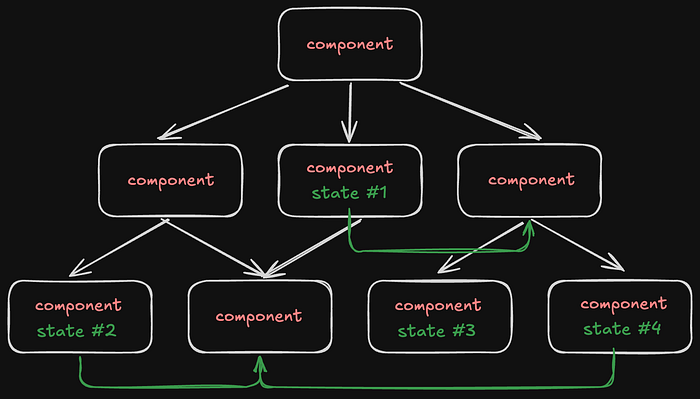
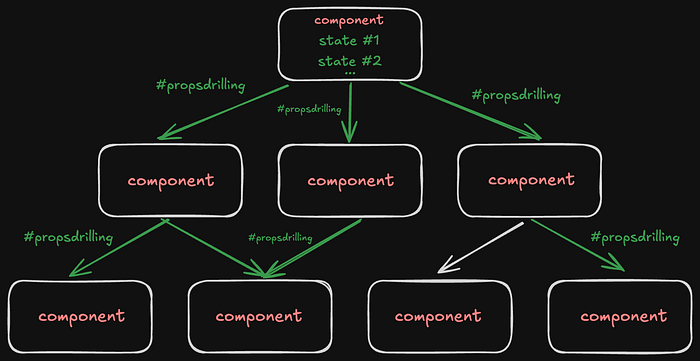
In React, for example, data is typically passed from parent components to child components using props. But when we need to share data between components that are far apart in the tree, we run into the problem of “prop drilling” — having to pass props through multiple intermediate components that don’t actually need them.
State updates make things even more complicated. If Component A needs to react to changes in Component B, which is located in a completely different part of the tree, managing such interactions becomes a non-trivial task without a centralized state management system.
This is exactly the problem that state management patterns like Flux and its popular implementation, Redux, aim to solve — providing a single, predictable data flow in the application.
Context in React
Before we dive into how Redux works and what Flux architecture is, we first need to understand React Context.
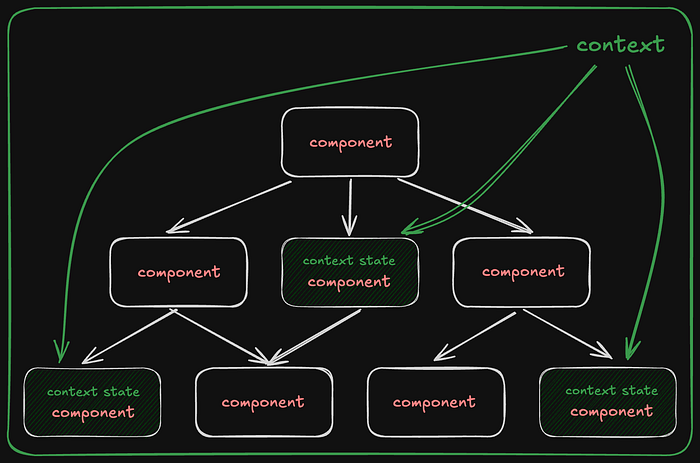
React Context — is a mechanism that allows us to pass data through the component tree without manually passing props at every level. Context creates a kind of “global” state (or wrapper) for a specific part of the application.
With the Context API, we can create a data store that is accessible to all components in the tree, regardless of their position or nesting. This solves the problem of “prop drilling,” where props have to be passed through multiple intermediate components.
However, while Context is great for providing access to data, it has limitations when it comes to managing state changes:
- Context does not provide a standardized way to modify state.
- Updating context can trigger unnecessary re-renders of components.
- As the application grows, it becomes harder to track where and how state changes happen, especially since we can create multiple contexts and wrap different parts of the project.

Flux Architecture
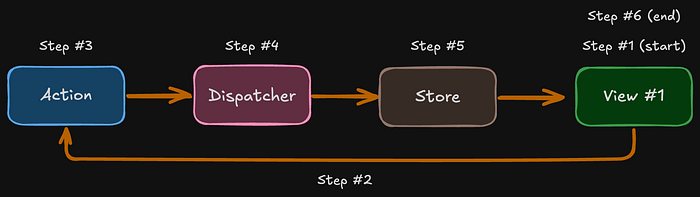
Flux — is an architectural pattern developed by Facebook for working with React. It ensures a one-way data flow, making the application state more predictable and easier to track.
Unlike the familiar Context-based flow, Flux introduces a more structured approach with additional elements:
- Action: An object that contains the type of action and the necessary data for modifying the state. Actions describe what happened but not how the state will change.
- Dispatcher: A central hub that distributes actions to the appropriate stores.
- Store: Holds the application state and the logic for modifying it. Unlike Context, a store doesn’t just store data — it also defines how it can be changed.
- View: Displays data from the Store and dispatches Actions when the user interacts with the interface.

How Data Updates Work:
- The user interacts with the View (e.g., clicks a button).
- The View creates an Action and sends it to the Dispatcher.
- The Dispatcher forwards the Action to all registered Stores.
- The Store updates its state based on the Action received from the Dispatcher.
- The Store notifies the View about the state change.
- The View retrieves the updated data from the Store and re-renders.
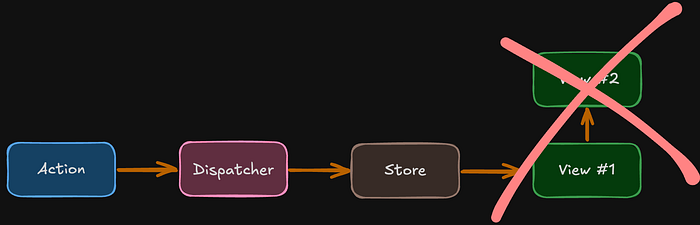
A logical question arises: what if we have multiple Views, and we want to share data from “View #1” with “View #2” ? The answer is simple — we must go through the full cycle of the one-way data flow.
In other words, direct data transfer from View #1 to View #2 is not allowed and will not be used!
Redux
Redux is a state management library that implements the Flux architecture.
Key Features of Redux:
- Single Store — The entire application state is stored in a single object.
- Read-Only State — State cannot be modified directly.
- State Changes via Pure Functions (Reducers) — Updates happen through reducers, which are pure functions that take the previous state and an action, then return a new state. Since applications can have multiple states, we can have multiple reducers. A simple analogy: Reducers work similarly to
useState(), where a setter updates the previous state. - One-Way Data Flow — Changes always follow a predictable pattern.
Practical Example: Creating a Redux Application
Let’s go step by step and build a simple application with multiple states.
- Setting Up the Project
$ pnpm create vite my-redux-app --template react

$ pnpm create vite
2. Organizing Files
A good practice is to place Redux-related code in a separate folder:
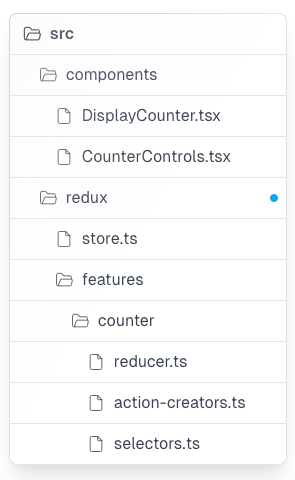
3. Creating the Store
The Store is the heart of Redux — it holds all the application states.
// src/redux/store.ts

import { combineReducers, createStore } from "redux"
import { counterReducer } from "./features/counter/reducer"

/**
 * Root reducer
 * Combines all application reducers into a single state tree.
 */
const rootReducer = combineReducers({
  /**
   * Counter state slice
   */
  counter: counterReducer,

  /**
   * Theme state slice
   * Temporary static reducer (can be replaced with real reducer later)
   */
  theme: () => "light",
})

/**
 * Redux store
 * Centralized state container for the application.
 */
export const store = createStore(rootReducer)

/**
 * RootState type
 * Represents the complete state shape of the Redux store.
 */
export type RootState = ReturnType<typeof rootReducer>
Unlike React Context, where you can create multiple separate contexts for different parts of the state, Redux uses a single store for all states.
4. Connecting Redux to the Application
// src/main.tsx

import React from 'react'
import { createRoot } from 'react-dom/client'
import { Provider } from 'react-redux'
import { store } from './redux/store'
import App from './App'

createRoot(document.getElementById('root')!).render(
  <React.StrictMode>
    <Provider store={store}>
      <App />
    </Provider>
  </React.StrictMode>
)
Just like with React Context, we need to wrap our application in a Provider and pass the store we created earlier as a prop. Key concepts from the store:

Press enter or click to view image in full size
- observable — An object that watches for state changes and notifies other parts of the app when updates occur.
- dispatch — A function that triggers reducers.
- getState — To get data from the store, we use the
getStatefunction, which might return something like{ counter: 1, theme: "light" }.
A Reducer is a pure function that takes the current state and an action, then returns a new state.
// src/redux/features/counter/action-creators.ts

/**
 * Define the action types (using enums as well)
 */
export enum CounterActionType {
  INCREMENT = "INCREMENT",
  DECREMENT = "DECREMENT",
}

/**
 * Types for actions
 */
export interface IncrementAction {
  type: CounterActionType.INCREMENT
}

export interface DecrementAction {
  type: CounterActionType.DECREMENT
}

export type CounterAction = IncrementAction | DecrementAction

/**
 * Action Creators
 */
export function incrementCounter(): IncrementAction {
  return { type: CounterActionType.INCREMENT }
}

export function decrementCounter(): DecrementAction {
  return { type: CounterActionType.DECREMENT }
}
Important: A reducer must always return a new state and should never modify the existing one. A reducer must have a default value for the initial state. Otherwise, we may encounter an error like:
Uncaught Error: The slice reducer for key "counter" returned undefined during initialization.
If the state passed to the reducer is undefined, you must explicitly return the initial state.
The initial state may not be undefined. If you don't want to set a value for this reducer, you can use null instead of undefined.
Finally, don’t forget to import the reducer into our store.
// src/redux/store.ts

import { combineReducers, createStore } from "redux"
import { counterReducer } from "./features/counter/reducer"

const rootReducer = combineReducers({
  counter: counterReducer, // replace instead of `() => 1`
  theme: () => 'light'

export const store = createStore(rootReducer)

export type RootState = ReturnType<typeof rootReducer>
6. Creating Selectors
We will create two components:
DisplayCounter— Displays the current counter value.CounterControls— Contains buttons to increase or decrease the counter.
First, we define the counterSelector function and pass it into the useSelector(counterSelector) hook.
Selectors are functions that extract specific data from the state.
// src/redux/features/counter/selectors.ts

import { RootState } from "../../store"

// Selector to get the counter value
export const counterSelector = (state: RootState) => state.counter
// src/components/DisplayCounter.tsx
import { useSelector } from "react-redux"
import { counterSelector } from "../redux/features/counter/selectors"
export const DisplayCounter = () => {
/**
* useSelector subscribes to changes in the store
* and returns the right part of the state
*/
const counter = useSelector(counterSelector)
return <div>Counter value: {counter}</div>
}7. Defining Actions
In the CounterControls component, we update the state using the useDispatch(incrementCounter()) hook.
Actions are simple objects with a type field that describes what happened in the application. For example, our action types will be:
"INCREMENT""DECREMENT"
// src/redux/features/counter/action-creators.ts

/**
 * Define the action types (using enums as well)
 */
export enum CounterActionType {
  INCREMENT = "INCREMENT",
  DECREMENT = "DECREMENT",
}

/**
 * Types for actions
 */
export interface IncrementAction {
  type: CounterActionType.INCREMENT
}

export interface DecrementAction {
  type: CounterActionType.DECREMENT
}

export type CounterAction = IncrementAction | DecrementAction

/**
 * Action Creators
 */
export function incrementCounter(): IncrementAction {
  return { type: CounterActionType.INCREMENT }
}

export function decrementCounter(): DecrementAction {
  return { type: CounterActionType.DECREMENT }
}
// src/components/CounterControls.tsx
import { useDispatch } from "react-redux"
import {
decrementCounter,
incrementCounter,
} from "../redux/features/counter/actions"
export const CounterControls = () => {
/**
* useDispatch returns the dispatch function to send actions to the store
*/
const dispatch = useDispatch()
/**
* Create actions using action creators
*/
const increment = incrementCounter()
const decrement = decrementCounter()
/**
* Handler functions for buttons
*/
const onIncrement = () => dispatch(increment)
const onDecrement = () => dispatch(decrement)
return (
<div className="flex items-center space-x-2">
<button
className="px-5 py-2 border rounded-lg"
onClick={onIncrement}
>
+1
</button>
<button
className="px-5 py-2 border rounded-lg"
onClick={onDecrement}
>
-1
</button>
</div>
)
}8. Using Redux in the Application
Once everything is set up, we can integrate Redux into our app and see how the state updates in action!
// src/App.tsx

import { DisplayCounter } from './components/DisplayCounter'
import { CounterControls } from './components/CounterControls'

export default function App() {
  return (
    <div className="App">
      <h1>My Redux Counter</h1>
      <DisplayCounter />
      <CounterControls />
    </div>
  )
}
How Does Redux Work?
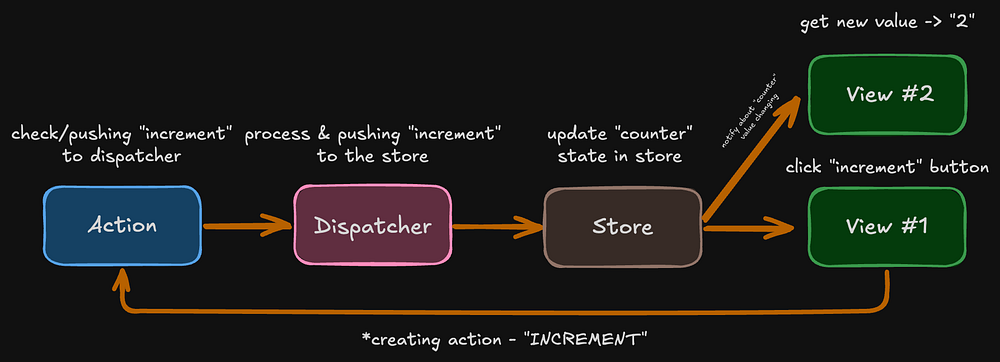
Let’s break down what happens when a user clicks the “+1” button:
- The user clicks the “+1” button.
- The
onIncrementfunction is triggered, which dispatches an action:{ type: “INCREMENT” } - Redux sends this action to
counterReducer, since the action is related to thecounterstate. - The
counterReducerdetects the"INCREMENT"action type and returns a new state (state + 1). - Redux updates the state in the store.
- All components using
useSelector(counterSelector)receive a notification about the state change. - The
DisplayCountercomponent re-renders with the updated counter value.
This is the one-way data flow in Redux!
Redux in Real Life
To better understand Redux, imagine it as an emergency response system:
- Store → The dispatch center that keeps track of all incidents.
- Actions → Emergency calls reporting incidents.
- Dispatch → The actual call to 911.
- Reducers → The specific emergency responders (firefighters, ambulance, police) that handle only their type of incident.
- Selectors → The methods used to retrieve information from the dispatch center.
Benefits of Redux
- ✅ Predictability — State changes only through actions and reducers, making the flow consistent.
- ✅ Centralization — All application state is stored in a single place.
- ✅ Debugging — Every state change can be tracked.
- ✅ Testing — Reducers are pure functions, making them easy to test.
- ✅ Caching — The state can be saved and restored between sessions.
When Should You Use Redux?
Redux is especially useful when:
- You have multiple states used across different parts of the app.
- State update logic is complex.
- Many developers are working on the same project.
- You need to track every state change.
- You want to persist state across page reloads.
Resources
Conclusion
Now You Know Redux! As you can see, by breaking it down into parts and gradually implementing it into your application — plus adding some automation — you can make your app more reliable and free from unnecessary complexities!